
Breaking News:
Welcome to the tutorial page! Here you will learn how to change the poll feature and update the headline scroll. There are links to jump to the part you need. Please view this page by hitting "Preview" in the top right so you can click the links.
Headline Scroll Tutorial
Hello! I created this tutorial to provide instructions and other resources. I've broken it into three sections. The first will show you how to update the headlines which I promise is easier than it looks. The second will show you how to change the look of the scroll and explain what each line does. The third will have instructions on how to revert back to the Wix slideshow if you find that easier to work with, prefer the look of it, or if the marquee tag is no longer supported. Here are the links to jump to each section.
Updating the Scroll
Updating the headline scroll is really, really easy. Easier than the slideshow in my opinion. That involved a lot of clicking and waiting for the next slide to load, but for this, you just copy and paste. That's it! Here's a screenshot explaining how it works.

Now that you're familiar with how the links are set up, let's actually change the headlines. Here are the simple steps to achieving this.
1. Double-click the headline scroll.
2. In the code that pops up, copy and paste the new links and their corresponding headlines in the places noted above.
3. Click "Update" and make sure it looks right.
4. Click "Preview" in the top right and test it out to make sure the links are properly directed.
5. Hit "Publish" and you're done!
The code might start to look a little crazy when you add longer links and headlines, but if you put things in the right space, the headline scroll itself will look nice and work perfectly.
Changing the Look

This section will describe the function of each line. Though chances are you'll never need this, I highly recommend you read this anyway, especially the marquee section. We'll start out with the style. You can change the font, the color, and other things. Here is a site that is a wonderful resource if there are other things you'd like to change. Liveweave is really great for experimenting with and testing out code as well.

Next up is changing the marquee. It's pretty simple, and you'll probably only have to change the scroll delay. I don't know what "truespeed" does exactly, but it's doing something, so I'd leave it alone.
And that just about covers it for this section!
Reverting to Slideshow
I am not judging you for reverting to the slideshow method if you find it easier. Also, as I write this, the HTML marquee feature is supported by all browsers. But that might change in the future. So here is how to bring back the slideshow. Below is the actual slideshow which you will be duplicating.
So first, get back into editing mode and hover on the slideshow above. Look and double check that you're hovering on the slideshow and not just the text.

Now right-click and copy the entire slideshow.

Go back to the home page by navigating from the top left menu. Delete the HTML headline scroll on the home page.

Now you can paste the slideshow. Just right click.

Just drag it into position and you're done!

Say you chose the slideshow for aesthetic reasons and later decide you'd actually prefer the marquee. You can essentially repeat this same process, but instead, you'll be copying the headline scroll at the very top of the page. There will always be a copy of both the slideshow and marquee on this page as long as somebody does not delete it.
That basically covers everything about the headline scroll! Anything I didn't touch on here is easily Google-able, but if you still have questions, I can be reached at augustkalman@gmail.com.
Updating the Poll Tutorial
Fret not, this will be far less wordy than the section above.
First, go to Easypolls. Then, log in.

Next, go to this tab.
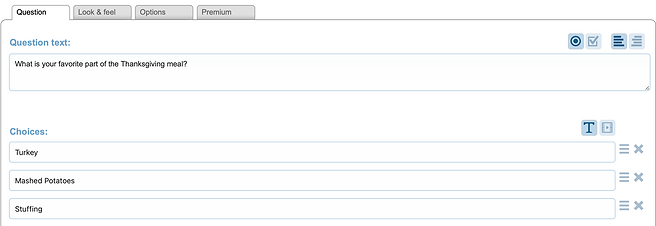
Find the most recent poll and double click it. It'll look like this.

Then save it as a new poll. That way the original is preserved, but the new one will have the same formatting.

Now you can go ahead and change the question text and choices here. When you're finished, hit "Save."
Then you just copy this code. Make sure the secure box is checked or it will not work.

Now you're ready to head back to Wix. Scroll to the poll on the homepage and double click the HTML. Then just paste your new code where you see the highlighted text. Update, save, and publish. Then you're done!

That's it for the tutorials. Thank you for your patience, and I hope this was able to help.